
One approach is to have the client listen for the events being emitted from the contract and then sending that to the web2 cache. This is a brittle approach as there is no guarantee that the client will properly receive the event and be able to send it to the cache.
My preferred approach is to have a poller that reads for events from my contract and stores them. This is more resilient since the poller will restart from the last block it successfully processed before moving on.
This blog will cover how to easily create the poller to populate your web2 cache using Firebase and CloudFunctions.
Prerequisites
- Firebase Project with CloudFunctions
- Infura Project for Ethereum
- Etherscan Project
Setup Firestore
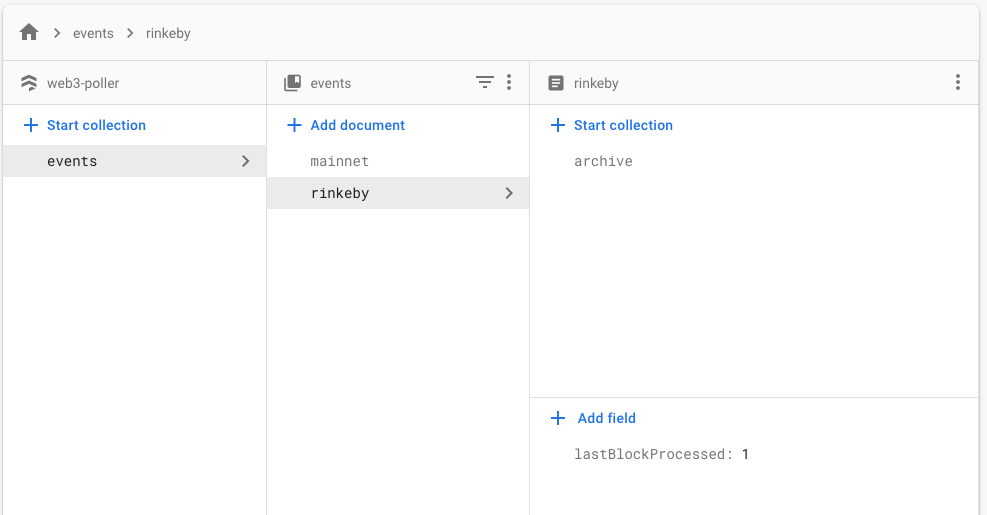
We’ll be using Firestore to store all of our events and to track the last block we processed. Go to the Firebase Console and create a new collection named “events”. The collection should have a sub-collection “archive” where we will be dumping each event we receive from the contract.
Create new CloudFunction
Let’s create a new function that will run every minute. To start, let’s have it call a simple function that prints out the time every minute. Make sure that your project has Pub/Sub and Cloud Schedule APIs enabled by checking in the Google Cloud Platform Console.
I recommend splitting out the internal logic from the polling function to be able to quickly test functionality with an API call. Take a look at the `httpPastEvents` function. This allows you to test locally and you won’t need to wait for the cron job to fire after deploys.
Deploy the new CloudFunction to verify that the cron job is running correctly. Check the logs in Firebase Console.
Configure Project for Polling
We’ll be making use of the Ethereum Web3 Package to monitor the contract and node-fetch to get the Contact Abi. Add the following packages to your project:
Note: to use the Web3 package with Typescript, please update your tsconfig.json to include the following:
Create these constants at the top of “getPastEvents.ts”. For production services, I’d recommend storing these as environment variables and secrets using Firebase’s Secret Manager.
Polling Logic
Let’s update our “getPastEvents” function to fetch the “lastBlockProcessed” from Firestore. Your function should look like this:
Create a new function to get the contract from Etherscan as this is necessary to fetch the correct events. There are different ways to do this such as using libraries or deploying the contract’s abi with the code. I find it is easiest to create a simple function to fetch from Etherscan.
Now, we’re able to query for the events from our contract. In the next section, we’ll cover how to parse and archive the events. After archiving, we’ll update the “lastBlockProcessed” in Firestore.
Archiving the Events
Ethereum greatly reduces the size of information that is sent in events. For instance, our events should send a map of Addresses to their Status but this data is sent as a 2d array as you can see in the example event below (look at “adminMods” and “addrStates”).
Firestore isn’t able to store 2d arrays so we wrote the function below for parsing the data.
If your events don’t send maps, Typescripts JSON.parse() function works well.
There’s a lot going on here so let’s step through it. Our contract sends events with maps called “addrStates” (this is a map of addresses to states) and “adminMod” (this is a map of an admin’s address to their modification — being added, being deleted).
Section one checks to see if this is a nested Object. If so, we want to know if it is either “adminMods” or “addrStates” as we expect both of those objects to be there. If not, let’s recurse through the event in Section 2. Section 3 helps us make sure that the address is kept in the form we expect (e.g. 0x1234….) and section 4 handles primitives.
Now that we are able to parse the events, let’s actually store them into Firestore in the archive sub-collection. Create a new function:
Comment out the “addEventsToArchive” call in “getPastEvents” and you are all set. You can see the complete code here.
There’s a ton of different things you can do once you have the web3 data with your web2 data. For example, imagine admins are adding wallets to the Allowlist but they haven’t pushed them on-chain yet. These users are in a staging state but we want to abstract that complexity from our end user so we create a union between the two datasets.
If you have any questions, please feel free to leave a comment or hit me up on Twitter. Thank you for reading!One of the key challenges in building a dApp for Ethereum is keeping web2 metadata in sync with the data on chain. For example, take a dApp that has an Allowlist of users who are eligible to mint an NFT. The creator could choose to store the wallet address and the user’s Twitter handle on chain, but this would become unnecessarily expensive due to high gas prices. Many devs are choosing to store the user metadata in web2 (e.g. Firebase, Postgres, etc.) and their status in web3. This results in lower gas prices and faster reads.
